Sometimes,
it’s worth being different. That's why
this Thanksgiving I’m skipping the traditional Pumpkin Pie and putting my money
on an elegant, luxurious and oh so chocolatey Chocolate Tart. I’m going
big and bold, that’s for sure, and hopefully it’ll pay off!
I
rarely brag about my favorite cookbooks, but this jewel is high up on my list
and always good to have close at hand when your sweet cravings kick in. So, here you have it – I’m head over heels in
love with Dorie Greenspan’s superb book Paris
Sweets. I hope that you still recall
those buttery sweet golden madeleines I posted a while back. Yes, those recipes came from this particular
book. Paris Sweets has been living on my cookbook shelf for some time
now, but I’ve kind of abandoned it, lately.
Shame on me…
So,
when time came to look for a brilliant chocolate tart recipe to make things
interesting this Thanksgiving, I had to dig it up again. Thumbing through it I not only stumbled upon
the perfect recipe and my new Thanksgiving center piece candidate, but I also
discovered some new information on – wait for it – chocolate. You may already know some of it but knowing
more about chocolate never hurts.

Did
you know that the liquor, or the so called cacao or cocoa, the ground nib of
the cacao bean is what makes chocolate chocolate? The unsweetened chocolate, or baking
chocolate, contains 100 percent chocolate liquor. All the other chocolates – bittersweet,
semisweet, milk, and imported white – are a mix of sugar, often additional
cocoa butter, and occasionally cocoa powder.
Therefore, the greater the percentage of cacao, the more chocolatey and
less sweet the chocolate will be. In the
U.S., bittersweet and semisweet chocolates are one and the same and, according
to the FDA, must contain a minimum of 35 percent cocoa liquor. That aside, French pastry chefs usually opt
for chocolates with a minimum of 60 percent cocoa and more often than not
choose chocolates that have 70 percent cocoa liquor or even more.

For
this chocolate tart, I opted for my favorite (and always widely available)
Swiss chocolate and my second favorite Swiss brand, Lindt. In case you’re
wondering… my number one Swiss brand is he – and he also happens to love Lindt. How cute is that? I used 7 ounces of 70 percent cocoa Lindt
chocolate, and 5 ounces of 54 percent cocoa Baker’s chocolate. I was afraid that my not-so-much-of-a-chocolate-lover
side wouldn’t take that much bitterness especially since there’s no added
sugar!
The
results are wondrous and whimsical and everything in between. First of all, you’ll have to really resist
the temptation to devour the butter and almond cream when you’re preparing the
dough. The butter scent will overwhelm
you and so will the cookie dough that will come out of all the mixing.
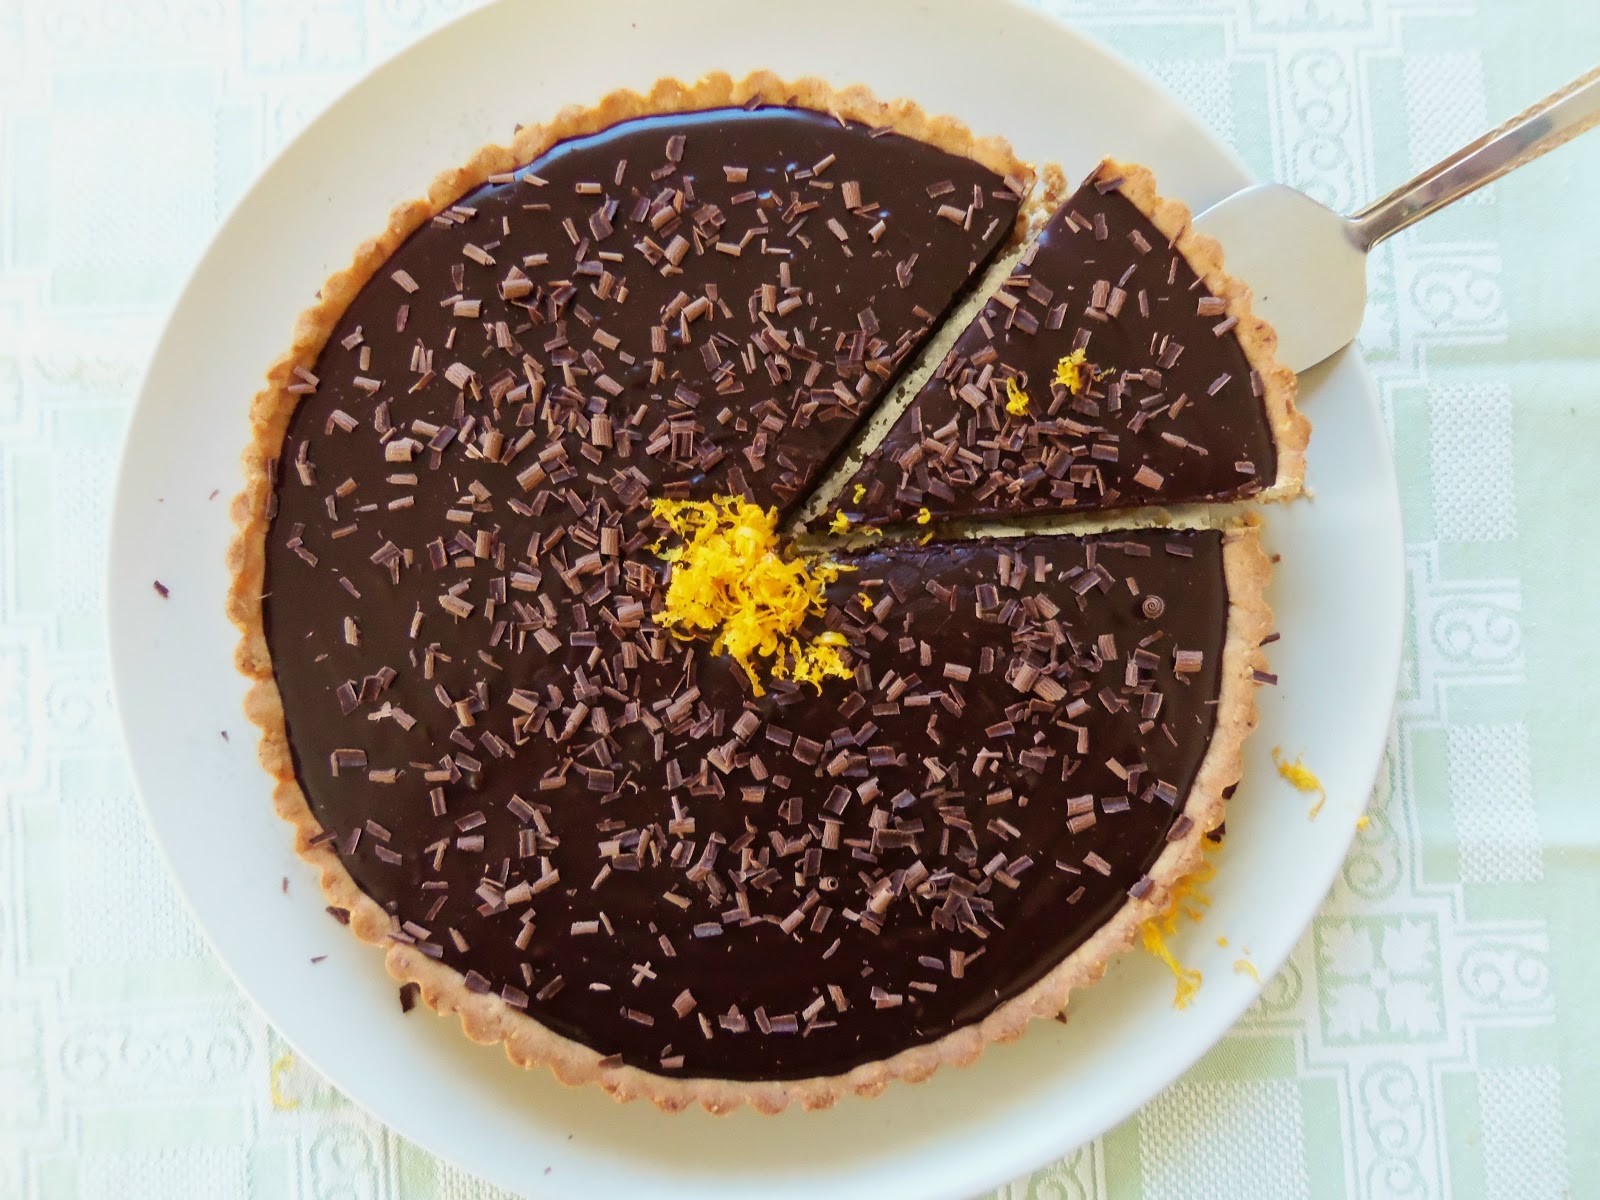
This
tart is so simple, yet its flavors are so complex and elaborate. The crust is crunchy but delicate, sweet and
nutty with a faint toasty undertone.
It’s the perfect textural balance to the smooth ganache. Oh, the chocolate ganache… it’s so glossy that
you can almost see your reflection in it.
And it’s insanely rich and silky and every bit as seductive.
I’ve
made the chocolate ganache with and without orange zest. If you prefer the sophisticated, unadorned
classic, leave the orange zest out; if you feel adventurous and in the mood for
a classic marriage, add the orange zest.
Trust me, you won’t regret it!
The orange zest adds a tad of freshness and citrusy perfume, boosts the
flavors to a new level, and cuts through the smooth dark chocolate richness. Plus, the chocolate shavings on top boost the
tart’s already sensuous good looks.
Needless
to say, the flavors and aromas are forever embroidered into my brain and taste
buds; but most importantly, this tart reminds me time and time again that I
don’t have to be in Paris to indulge in the city’s iconic sweets!
Chocolate Tart
Adapted
from Paris Sweets by Dorie Greenspan
Serves: About 10 servings
Special
equipment: A 10-inch tart pan
Note: The recipe calls for a 6 ½ inch tart
shell. However, having only a 10-inch
tart pan on hand I thought that it might work just fine if I tweaked the base
recipe here and there; and, guess what, no surprises there – it worked out
beautifully. In fact, I would say that I
wouldn’t have it any other way – the bigger, the fuller with chocolate, the
better!
You’ll
see that there are a couple of steps to make this splendid chocolate tart;
don’t let that discourage you. What I
recommend is that you prepare the dough the day before and let it rest in the
fridge overnight.
Ingredients for the Sweet Tart Dough:
·
2 ½ sticks unsalted butter, at room
temperature
·
1 ½ cups confectioners’ sugar, sifted
·
½ cup ground blanched almonds (¼ cup of these
were toasted before I ground them)
·
½ teaspoon salt
·
½ teaspoon pure vanilla extract
·
2 large eggs, at room temperature
·
3 ½ cups all-purpose flour
Instructions:
Note: This is a large recipe – enough for two
10-inch crusts. With a dough like this,
the texture is always better if you make a large batch, so it’s best not to cut
the proportions; rather, make the full recipe and freeze the dough you don’t
need at the moment: frozen tart dough is always a good thing to have on hand. Frozen disks of dough take 45 to 60 minutes
at average room temperature to reach a good rolling-out consistency.

In a
large bowl, using an electric hand mixer, beat the butter until creamy,
scraping down the sides of the bowl as necessary. Add the confectioners’ sugar and process to
blend well. Add the ground almonds,
salt, and vanilla and continue to process until smooth, scraping the bowl as
necessary. Lightly stir the eggs together
with a fork and, with the mixer running, add them to the bowl; process for a
few seconds to blend. Finally, add the
flour and process until the mixture just starts to come together. When the dough forms moist curds and clumps
and then starts to form a ball, stop! – you don’t want to overwork it. The dough will be very soft, and that’s just
as it should be.

Gather
the dough into a ball and divide it into 2 pieces. Gently press each piece into a disk and wrap
each disk in plastic. Freeze one disk if
you plan on making only one tart, and put the other one in the fridge. Allow the dough to rest in the fridge for at
least 4 hours, or for up to 2 days, before rolling and baking (The dough can be
wrapped airtight and frozen for up to a month.)
Butter
the tart pan and place it on a parchment-lined baking sheet. What makes this dough so delicious – lots of
butter – also makes it a little difficult to roll. What I found to work best is to roll the
dough out on a sheet of plastic wrap.
Just flatten a large piece of plastic wrap against the counter and roll
the dough. Flour the rolling pin often
so that the dough doesn’t stick to it.
Turn the dough over often so that you can roll it out on both sides.

Once
rolled out, center the dough (exposed side down) over the tart pan. Gently press the dough against the bottom of
the pan and up the sides, remove the sheet of plastic wrap, and roll your
rolling pin across the rim of the pan to cut off the excess. If the dough cracks or splits while you’re
working, don’t worry – you can patch the cracks with leftover dough (moisten
the edges to “glue” them into place).
Just be careful not to stretch the dough in the pan (what you stretch
now will shrink later). Chill for at
least 30 minutes in the fridge.
When
you are ready to bake the crust, preheat the oven to 350°F. Line the crust with a circle of parchment
paper or foil and fill with dried beans or rice.
Bake
the crust for 25 minutes, or until very lightly colored. Remove the parchment and beans and bake the
crust for another 12-14 minutes, or until golden. Transfer to a rack to cool. (Baked crusts can be kept uncovered at room
temperature for about 8 hours).
Ingredients for the Chocolate Ganache:
·
12 ounces bittersweet chocolate, finely chopped
·
1 cup heavy cream, plus 1 Tablespoon
·
2 large egg yolks, at room temperature
·
3 Tablespoons unsalted butter, at room
temperature
·
1 teaspoon vanilla extract
·
Optional: orange zest from one large orange
·
Optional: bittersweet chocolate shavings to decorate
the top of the tart
Instructions:
Put
the chocolate in a heatproof bowl and keep it close at hand. In a small bowl, beat 1 Tablespoon of the
heavy cream with the egg yolks just until the eggs are liquid. Check that the butter is soft but not oily. If necessary, either beat it with a rubber
spatula to soften it or smear it against the counter under the heel of your
hand.

Pour
1 cup of the heavy cream into a saucepan, add the vanilla extract, whisk
together, and bring the mixture to a full boil over medium-low heat. Then pour the hot cream over the
chocolate. Wait for about 30 seconds,
then, working with a whisk, gently blend the cream into the chocolate. Still whisking delicately, incorporate the
yolks, followed by the butter (and orange zest if using). Pour the ganache into the crust. Jiggle the crust a bit to even out the
ganache, and leave the tart on the counter until the filling sets, about 20
minutes, depending on the temperature of your kitchen. (If your kitchen is really warm, pop the tart
into the fridge for 20 minutes, just to set the ganache, then keep it at room
temperature after it has set).

Note
1: The recipe states that the tart is
best served at room temperature the day it is made. We couldn’t finish it all the day I made it
so I refrigerated it overnight. It was
still perfect the second day and the following, too. Just make sure to let the tart stand at room
temperature for about 2 hours before serving.
Note
2: This tart is lovely straight up, on
its own, but it’s just as lovely with a dollop of whipped cream or crème
fraȋche.
Poftă
Bună! (Bon Appétit!)