April 26, 2013

Strawberry Cake

It may be a tad early but since strawberries are emerging left and right at the markets these days, it would be fair to admit that strawberry season is upon us.  Last week, I had boxes and boxes of strawberries greeting me at the market entrance.  Most of them are already big, beautiful and crimson, though their perfume and sweetness are rather subdued.  Strawberries are not at the peak of their season just yet, but they definitely shine in this Strawberry Cake. 


Growing up, my grandparents’ garden was vastly populated with gorgeous rows of strawberries.  And every spring I would peek underneath each strawberry patch savagely foraging for the ripest and most perfect exemplars.  The strawberries would reveal themselves like hidden treasures, which only made my thrill and enthusiasm almost palpable.  Now, if you assumed that these splendid fruits found their place into my grandmother’s Strawberry Cake, you would be totally wrong.  In fact, they were all reserved for the express purpose of eating them fresh.


That’s right!  So, this cake, although similar in shape with this glorious summer sensation, is known in my grandmother’s repertoire as a Sour Cherry Cake.  I just couldn’t wait for sour cherries to come into season and decided that strawberries would be the perfect substitute; and they were indeed.   


First, the strawberries are soaked and lightly sweetened in glossy agave nectar; then the exquisite bright red slices speckle the top, and while in the oven they descend slowly into the warm batter.  Out of the oven, the strawberries, just like the sour cherries, still maintain a delicate tartness that plays beautifully against the sweetness of the moist and light dough.  When I first made this cake, I didn’t know what to expect or how the strawberries would hold their shape and aroma; but it was all I hoped it would be – a charming, one for the ages Strawberry Cake!                       


Strawberry Cake
By Simply Romanesco inspired by my Grandma Vicki

Serves: 32 squares

Ingredients:

·         1 Tablespoon unsalted butter, for greasing the pan
·         1 kilogram (2 pounds) fresh strawberries, hulled and quartered
·         2 Tablespoons light agave syrup
·         400 grams (14 ounces) all-purpose flour, plus more for dusting the pan
·         8 grams (2 teaspoons) baking powder
·         6 large eggs, at room temperature
·         400 grams (14 ounces) confectioners’ sugar, plus extra for dusting
·         1 teaspoon vanilla extract
·         100 ml vegetable oil
·         100 ml tap water, at room temperature
·         1/8 teaspoon salt


Instructions:

Preheat the oven to 375°F.  Coat the bottom and sides of a 14 x10 x 2-inch baking pan with butter and flour.

In a small bowl, mix the strawberries and agave syrup and let stand at room temperature for 30 minutes.  Then drain the extra syrup from the strawberries.  Keep close at hand.

In a medium bowl, combine the flour and baking powder.  Set aside. 


Separate the egg yolks and egg whites.  In a large bowl, using an electric hand mixer on medium-low speed beat the egg yolks, confectioners’ sugar and vanilla extract for about 2-3 minutes until all the ingredients are well incorporated and the color is light yellow.  Gradually and with the hand mixer on low speed, add the vegetable oil and then the water until well incorporated.  In batches, add the flour and baking powder mixture and beat until incorporated.   


In a medium bowl, beat the egg whites and salt on medium-high speed until they hold medium-firm peaks.  In batches, gently fold the egg whites into the batter.   


Pour the obtained batter into the prepared pan.  Arrange the strawberries on top.  Bake for 45 to 50 minutes or until golden brown, a tester comes out clean and the fruits have submerged into the dough.  Cool for 10 minutes in the pan on a rack.  Slice the cake into squares and carefully take the squares out of the pan and arrange them on a serving platter.  Dust with confectioners’ sugar and enjoy! 


Note:  Feel free to use sour cherries instead of strawberries when sour cherries come into season.  You won’t regret it! 


Poftă Bună! (Bon Appétit!)

April 17, 2013

Double Chocolate Layer Cake

Do you know what the best thing is when you cook and learn new recipes alongside your grandmother?  You also get to teach her new recipes.  While at home, grandma Vicki and I made an old favorite, revisited a classic, baked a popular pie, and gave my grandma’s pork roast recipe a facelift.  But I also lured my grandma into baking together my spectacular-special-occasion-go-to chocolate cake.


The first time I ever made Barefoot Contessa’s Double-Chocolate Layer Cake was for Adrian’s 30th birthday; we were smitten at first bite, including myself especially since I’m not that much of a dedicated chocolate eater.  But this cake was something special.  I instantly knew that I had to share this recipe with my grandmother.  So, I took the recipe with me on my trip home and right before boarding our flight to Europe, I also grabbed the anniversary edition of Food & Wine magazine.  Thumbing through the magazine I stumbled upon the magazine’s pick for Best Chocolate Dessert – Barefoot Contessa’s Double-Chocolate Layer Cake.  I was stoked!  I knew I discovered a winner and was not looking for validation; but it’s funny how the choice of a renowned magazine can suddenly give you an extra boost of confidence that you indeed selected a special recipe!  


The first time I made this cake was also the first time I had ever tackled a two layer cake.  Back then, I was still rather tentative at undertaking such an ambitious baking project and the timing was questionable to say the least.  I knew I wanted to make something special for Adrian’s birthday, but to try something new on such a memorable occasion could have been a calamity into making.  Just the sole thought of failure made me break out into a sweat.  But it was a coup!  In the end, this ambitious baking project was a breeze to complete and a pleasantly soothing chocolaty experience.  The best part – my grandma and my entire family in Romania loved this cake.


This cake will forever change your perspective on chocolate cakes.  It’s so dazzling and imposing that it makes you swoon just staring at it; it’s moist and light, silky and fudgy, and the good bit of caffeine kick will easily make you skip that extra cup of coffee.  You can also give the cake a more festive treatment like my grandmother’s signature decoration that you can easily achieve by gliding the tip of a fork through the frosting; or you can leave it unadorned just with the old fashioned messy look.  Embellished or not, you’ll go for seconds in a heartbeat!   


Double-Chocolate Layer Cake
Adapted from Beatty’s Chocolate Cake by Barefoot Contessa

Makes: 10-12 servings

Ingredients for the Cake:

·         Butter, for greasing the pans
·         1 ¾ cups all-purpose flour, plus more for the pans
·         2 cups sugar
·         ¾ cups cocoa powder
·         2 teaspoons baking soda
·         1 teaspoon baking powder
·         1 teaspoon salt
·         1 cup buttermilk, shaken; OR 1 cup sour cream
·         ½ cup vegetable oil
·         2 large eggs, at room temperature
·         1 teaspoon pure vanilla extract
·         1 cup freshly brewed hot coffee


Ingredients for the Chocolate Frosting:

·         6 ounces semisweet chocolate
·         2 sticks unsalted butter, at room temperature
·         1 large egg yolk, at room temperature
·         1 teaspoon pure vanilla extract
·         1 ¼ cups sifted confectioners’ sugar
·         1 Tablespoon instant coffee powder


Instructions for the Cake:

Preheat the oven to 350°F.  Butter two 8-inch x 2-inch round cake pans.  (I used two 9-inch x 2-inch round cake pans and the result was beautiful.)  Line with parchment paper, then butter and flour the pans. 


In a large bowl, sift the flour, sugar, cocoa, baking soda, baking powder, and salt.  Mix until combined.  Using an electric hand mixer, combine the buttermilk (or sour cream), oil, eggs, and vanilla in another bowl.  With the mixer on low speed, slowly add the wet ingredients to the dry.  With the mixer still on low, add the coffee and stir just to combine, scrapping the bottom of the bowl with a rubber spatula.  Pour the batter into the prepared pans and bake for 35-40 minutes, until a cake tester comes out clean.  Cool in the pans for 30 minutes, then turn them out onto a cooling rack and cool completely.


Instructions for the Chocolate Frosting:

Chop the chocolate and place it in a heat-proof bowl set over a pan of simmering water.  Stir until just melted and set aside until cooled to room temperature. 


In a large bowl, using an electric hand mixer, beat the butter on medium-high speed until light yellow and fluffy, about 3 minutes.  Add the egg yolk and vanilla extract and continue beating for 3 minutes.  Turn the mixer to low, gradually add the confectioners’ sugar, then beat at medium speed, scrapping down the bowl as necessary, until smooth and creamy.  Dissolve the coffee powder in 2 teaspoons of the hottest tap water.  On low speed, add the chocolate and coffee to the butter mixture and mix until blended.  Don’t whip!  


Place 1 layer of the cake, flat side up, on a flat plate or cake pedestal.  With a knife or offset spatula, evenly spread the top with one-third of the frosting.  Place the second layer on top, rounded side up, and spread the remaining frosting over the top and sides of the cake.


Poftă Bună! (Bon Appétit!)     

April 5, 2013

Vegetable Sour Soup

A while ago, I told you about Romanians’ fascination with soup; that for us soup is an everyday affair regardless of season, and that we treat it with the utmost respect.  It’s so true!  What I omitted back then was that we have two types of soups in Romania, and that we make a clear distinction between them.  First, we have the clear soup filled with dumplings, homemade noodles or pasta.  Second, we have the sour soup, also known in Romanian as ciorbă, which is, as the name suggests, sour and tart thanks to the various souring agents used to flavor it such as lemon juice, vinegar or even sauerkraut juice.       


While home this time around, I was indisputably on a soup diet.  It wasn’t a diet per se; it was just the regular everyday Romanian custom of indulging in a bowl of soup before the main course.  And I didn’t mind it; not even a bit.  I can’t really decide whether I prefer the clear soup or the sour soup; they’re quite different and each unique and delicious in its own and delightful way.  


I’ve already shared with you grandma Vicki’s classic Chicken Ciorbă; a staple in our family and easily adaptable according to occasion.  You’ll see this sour soup made with pork for New Year’s, or with lamb for Easter, or with chicken for an uneventful Sunday lunch.  This Vegetable Sour Soup (Vegetable Ciorbă) sprung up from my experimenting with the classic only to come up with something cleaner and less sophisticated, yet still packed with flavor.  


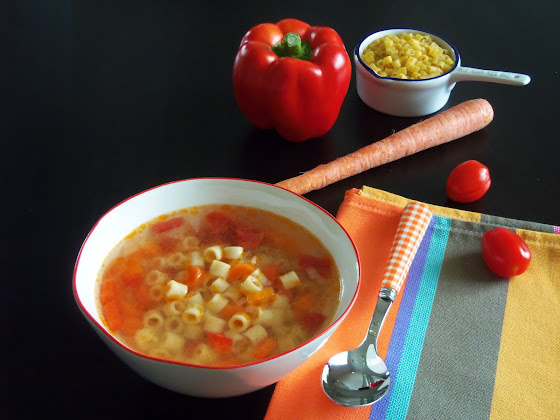
For me, this Vegetable Sour Soup (Vegetable Ciorbă) is one of those go-to soups or whenever-I-want-something-more-besides-the-main-course kind of soup.  I love that it’s a cinch to make; it’s light, refreshing, colorful and loaded with vegetables.  It doesn’t have meat but the tiny pasta acts like the meaty element of the dish, while the splash of vinegar spurs your taste buds.  A few sprinkles of fresh parsley are highly recommended but not mandatory.  As you can clearly see from the pictures, I didn’t use any parsley this time, but I’ll make sure to add it to my next pot of soup for that extra kick of freshness.  With or without parsley, this vegetable sour soup is simple and perfect to welcome spring! 


Vegetable Sour Soup (Vegetable Ciorbă) 
By Simply Romanesco inspired by my Grandma Vicki

Makes: 8-10 servings

Ingredients:

·         3 Tablespoons olive or vegetable oil
·         4-5 carrots peeled and chopped
·         1 medium yellow onion, chopped
·         1 red pepper, chopped
·         1 14.5-ounce can diced tomatoes
·         1 cup small pasta such as ditalini
·         Salt and pepper
·         1-2 Tablespoons white vinegar
·         Optional: a small bunch of fresh parsley, chopped


Instructions:

In a large pan, heat the oil over medium heat.  Add the carrots, onion and a pinch of salt and pepper.  Cook together for about 5 minutes adding a bit of water so that the vegetables don’t stick to the bottom of the pan.  Add the red pepper.  Cook for 2 minutes.  Add the can of tomatoes and mix well.  Cook everything together for 3 minutes stirring occasionally.  Add water to fill up the pan.  Season with salt.  Bring to a boil.  Turn the heat down and simmer for 25-30 minutes.  


In the meantime, bring a medium pot of salted water to a boil.  Drizzle a Tablespoon of oil.  Add the pasta and cook according to the directions on the package.  Drain well and keep close at hand.  


When the vegetables are cooked, season with salt to taste, and add the vinegar and bring back to a boil for 2 minutes.  Turn the heat off, add the pasta and stir well.  Sprinkle with fresh parsley on top. 

Note:  Let the soup cool completely before you put it in the fridge. 


Poftă Bună! (Bon Appétit!)     

March 28, 2013

Nutella Filled Cookies

I’m back in Pittsburgh, everyone!  But, it’s always such a thrill to go home.  Although, Pittsburgh is my new hometown, my true home is still Transylvania; perhaps, no place will ever change that. And this year was even more exciting to be home since it coincided with my birthday.  Yes, I was home for my birthday!   


I was born a couple of hours after what we consider in the Romanian tradition to be the first day of spring.  On March 1st, Romanians celebrate the first day of spring and the Mărţișor, an old custom when boys and men alike reward girls and women with a small token tied with a red and white thread.  Traditionally, women wear this symbol of spring as a brooch for the entire month.  Although, I was born on the second day of spring, this little trinket came with every birthday gift that I received growing up.  And in all honesty, I always loved that and the extensive collection of mărţișoare that I inevitably ended up with.  


While home, I was showered with mărţișoare and spoiled with tons of delicious food.  On the days prior to my arrival, I gave my grandma Vicki a comprehensive list of dishes that absolutely had to grace my lips while home.  And this year, the menu included these Nutella Filled Cookies also known in Romanian as Ișlere.  It had been a very long time since I got my hands on these little sandwich cookies.  Needless to say, I missed them greatly and this was the perfect occasion to reacquaint myself with them.  Of course, there was the triumphant and impossible to ignore birthday cake – actually cakes – but these buttery-chocolate-packed-macaron-look-alike cookies were nothing short of spectacular!


Straight from the oven, these cookies are delicate, lemony, nutty, and pleasantly sweet; but once a generous layer of Nutella is sandwiched between them and the top dipped in a puddle of shiny semi-sweet chocolate ganache the rich indulgence takes center stage.  Peanut butter could also work wonders snuggling between the thin rounds, but I’m more of a Nutella girl and on my palate the hazelnut spread will always feel unequivocally better.    


I have plenty of stories to tell and recipes to share with you from my trip, what we cooked and baked with grandma Vicki, but for now I’ll let you enjoy these chocolate gems, which would look beautiful on the Easter table.


Nutella Filled Cookies (Ișlere)
By Simply Romanesco inspired by Grandma Vicki

Makes: About 15 filled cookies


Ingredients:

·         150 grams (5 ¼ ounces; about 1 cup) all-purpose flour
·         150 grams (1 stick and 3 Tablespoons) unsalted butter, at room temperature
·         80 grams (2 ¾ ounces; ½ cup) confectioners’ sugar
·         80 grams (2 ¾ ounces) toasted ground walnuts
·         Lemon zest from one lemon
·         1 teaspoon fresh lemon juice
·         2 teaspoons vanilla extract, divided
·         Nutella
·         6 ounces semi-sweet chocolate chips
·         2/3 cup heavy cream
·         Fleur de sel (optional)


Instructions:

In a large bowl, combine the flour, butter, sugar, walnuts, lemon zest, lemon juice, and 1 teaspoon vanilla extract, and mix them together using clean hands.  If the dough is too wet and sticky, add a little bit of flour (1 teaspoon at a time – 2-3 teaspoons) until the dough comes together in a ball but is still soft.  Put the dough on a plate and refrigerate for 2 hours. 


In the meantime, line two large baking sheets with parchment paper and keep close at hand.

Preheat the oven to 375°F.


Divide the dough in two.  Dust the rolling pin and working surface with some flour and gently roll out the dough into a ¼-inch thick sheet.  Using a 2.5-inch cookie cutter, cut out the dough and gently transfer the rounds to the baking sheets (use a knife if the dough sticks to the working surface), spacing them 2 inches apart.  Bake the cookies for 13-15 minutes or until golden brown.  Transfer to a rack to cool.  Repeat with the remaining cookies. 


Once the cookies have cooled completely, spread half of them (on the flat side) with Nutella (about 1 Tablespoon each) and top them with the remaining cookies (flat side down).  


Place the chocolate chips in a small bowl.  Combine the heavy cream and the remaining 1 teaspoon vanilla extract in a small saucepan over medium-low heat.  Cook until small bubbles appear on the outside edge of the cream.  Pour the hot cream mixture over the chocolate chips. Using a spoon, gently stir until all the chocolate is melted and the mixture is smooth.


Dip the tops of each sandwiched cookie in the ganache and transfer to a plate or baking sheet.  Allow the cookies to set at room temperature for 20 minutes.  Optional: sprinkle the cookies with fleur de sel.    


Poftă Bună! (Bon Appétit!)