October 31, 2015

Salted Caramel-Filled Fudge Brownies

Truth be told, I’ve never been a great admirer of brownies.  Maybe that’s why I’ve been selfishly skimming over every brownie recipe to ever grace my path.  But then, these Salted Caramel-Filled Fudge Brownies came along.  The key word here is “salted caramel,” Adrian’s favorite.  Hence, I was mildly intrigued and hugely tempted to give them a whirl and I instantly knew my husband would truly appreciate my change of heart.  What would I have to lose after all – his sweet tooth would be fed and my curiosity satisfied when it came to brownies and especially this atypical salted caramel-sandwich-like-specimen.  


Since tonight is Halloween, I totally understand if making these brownies for this celebration is a challenge.  But they can easily be whipped up for Thanksgiving or Christmas or any other non-celebratory occasion that comes to mind.  In fact, they’re the perfect midweek sweet treat if you’re to ask me! 
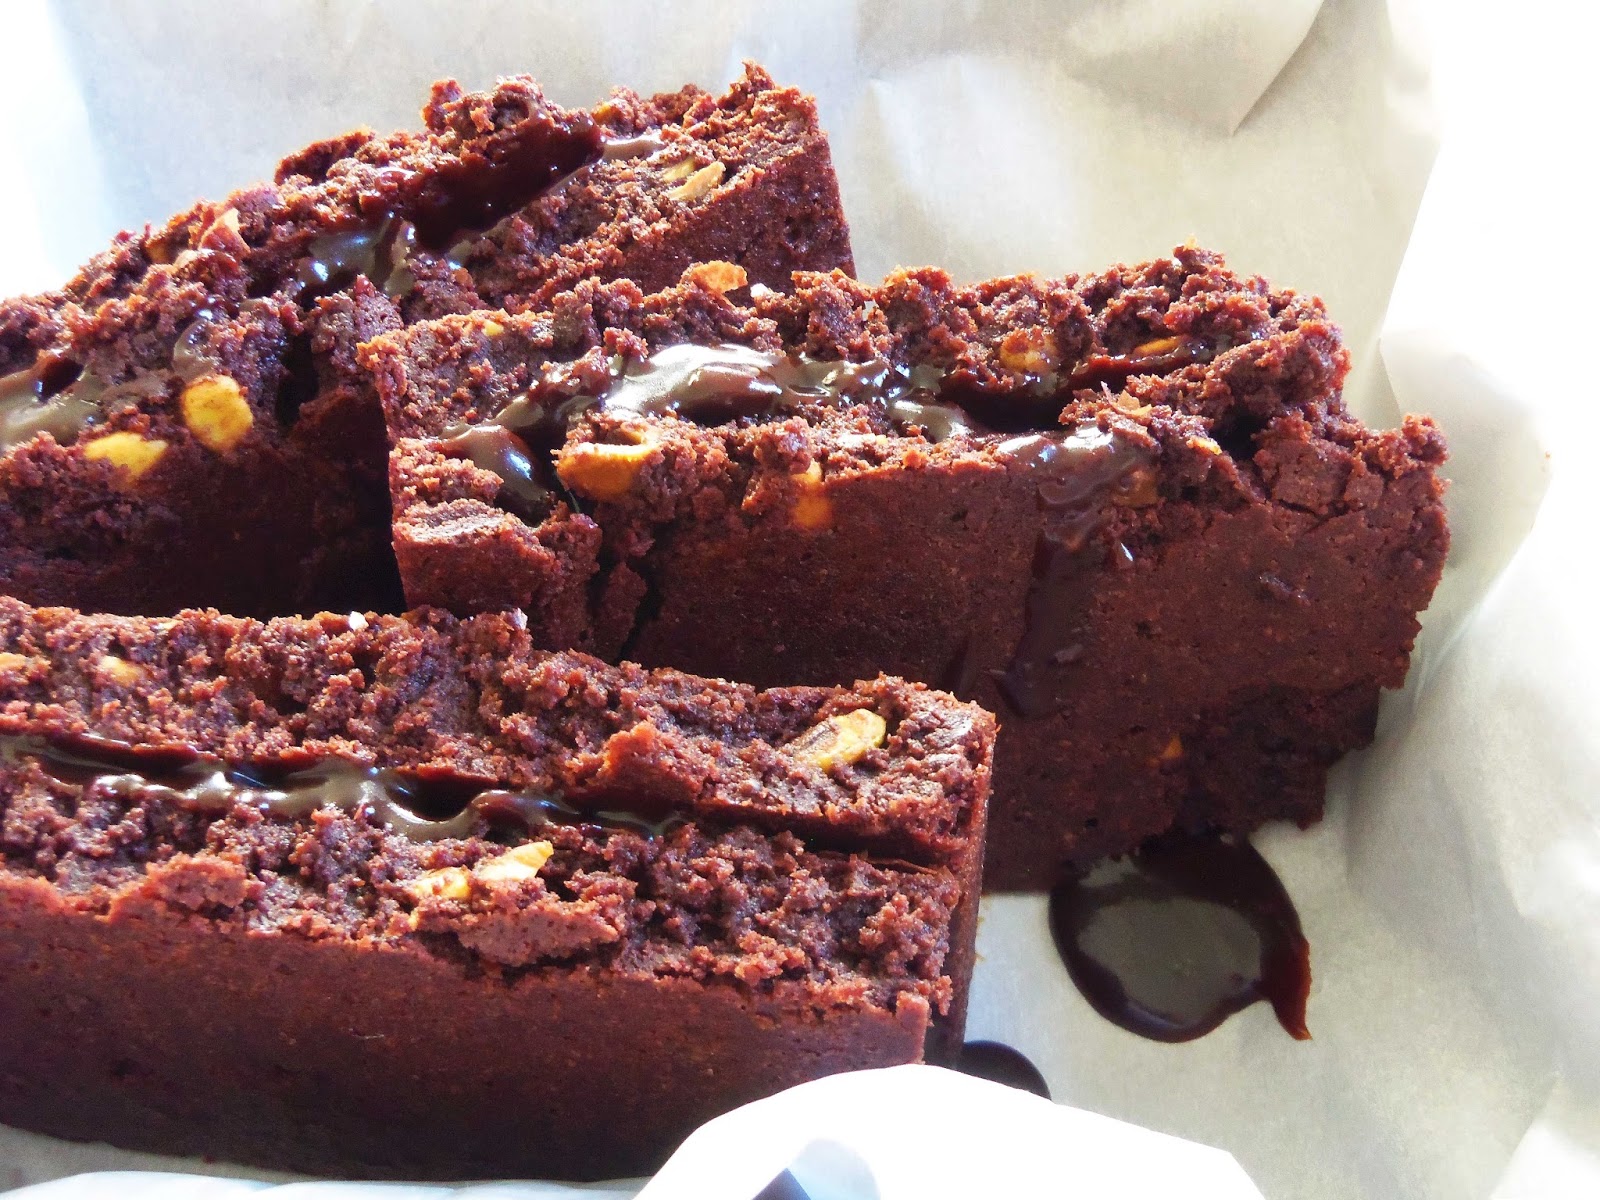


These Salted Caramel-Filled Fudge Brownies are crackly on top, fudgy and soft with the right amount of toasty crunch inside, and gooey and blissfully sticky when your teeth hit the sandwiched caramel in the middle.  They will melt on your tongue and leave a trail of sweet and salty goodness behind.  To be honest, chemistry was never my forte but I find it rather fascinating how this deep amber liquid springs to life in about twenty minutes.  Not to mention the way it acts as the glue that keeps together the two buttery chocolate brownies.  However, I won’t hold it against you if you decide to forgo the salted caramel and just enjoy these fudgy brownies on their own.  


These sweet treats are a take on the popular caramel-filled brownies that you may find at Bad Brownie in London.  Good thing I don’t have to fly all the way across the pond for a bite, although I’d love to give them a try someday soon.  Until then, these brownies are definitely a feast!  Enjoy and Happy Halloween! 


Salted Caramel-Filled Fudge Brownies
Adapted from Food & Wine (June 2015)

Makes: 10-12 brownies

Ingredients:

Caramel:
·         1 ¼ cups sugar
·         3 Tablespoons water
·         ¾ cup heavy cream
·         4 Tablespoons unsalted butter
·         1 ½ teaspoons flaky sea salt

Brownies:
·         2 sticks unsalted butter, plus more for greasing
·         10 oz. bittersweet or semisweet chocolate, finely chopped
·         1 ½ cups sugar
·         ¼ cup unsweetened cocoa powder
·         2 teaspoons vanilla extract
·         ½ teaspoon kosher salt
·         3 large eggs, chilled
·         1 cup all-purpose flour
·         ½ cup roasted pistachios (optional)


Instructions for the caramel:

In a medium saucepan, cook the sugar with the water over moderate heat, swirling the pan frequently, until a dark amber caramel forms, about 18-20 minutes.  Slowly drizzle in the cream, then whisk in the butter and sea salt.  Transfer the caramel to a small bowl and refrigerate until thickened, about 2 hours. 


Instructions for the brownies:

Preheat the oven to 325° F.  Lightly butter a 9-by-13 inch metal baking pan. 


Melt the 2 sticks of butter in a heatproof medium bowl set over (not in) a saucepan of simmering water.  Add the chopped chocolate, the sugar, cocoa powder, vanilla and salt and stir until smooth.  Remove the bowl from the heat and whisk in the eggs one at a time.  Whisk well after each one.  Add the flour and stir until just incorporated.  If you are using the roasted pistachios, this is the time to gently fold them in.  


Scrape the batter into the prepared pan and bake the brownies for 35-40 minutes, until a tester inserted in the center comes out with a few moist crumbs attached.  Check the brownies after 35 minutes.  Transfer the pan to a rack and let cool completely.  


Invert the brownies onto a cutting board and cut in half to form 2 rectangles.  Spread the chilled caramel over 1 rectangle, then top with the other rectangle.  Cut into 10-12 bars and serve immediately. 


Note:  The caramel can be refrigerated for 2 weeks.  The brownies can be refrigerated for 3 days or frozen for 1 month.


Poftă Bună! (Bon Appétit!)

September 30, 2015

Salmon Baked in Foil and four years of blogging

The past four years have gone by in a breeze.  So what better way to celebrate the four year milestone of this little blog than with a breezy recipe?  Thank you to all my friends out there who make this journey fun, exciting and worthwhile, who try my recipes and who read my mostly incoherent ramblings.  I couldn’t have done it without you!  Thank you all so much!! 


Recently, it would seem that I’ve been avoiding complicated recipes like the bubonic plague.  Well, maybe I’m being a tad harsh; I wasn’t so adamant at dodging any elaborate recipes per se, I just happened to be really absorbed in this phase of lazy cooking, the less cooking involved the better.  Or you can say that I’ve been basking in the realm of easy, clean and few-ingredient dishes.  


And this Salmon Baked in Foil recipe is right up that alley.  Not to mention that this is a dish Adrian and I have been feasting on more times than I care to count this summer and we’re still not tired of it.  Every time I was mulling over what to whip up for dinner, a tiny voice was growling in my head: salmon, salmon, salmon.  Besides, it’s the first year that I’m celebrating my blog’s anniversary with a non-plum related recipe.  That says a lot!    


In a nutshell, this Salmon Baked in Foil is an unpretentious and easy dish with a nice gourmet edge to it; it’s simple, superb and mess-free.  The fish is perfectly cooked and the wrapping produces a lip-smacking blend of flavorful juices and aromas.  The only downside to it – it’ll be hard if not downright impossible to order salmon in a restaurant once you’ve tried this recipe.  Pair it with this lovely Creamed Corn or this Fluffy Basmati Rice and you’ve got yourself a sinfully delicious meal!  Enjoy!   


Salmon Baked in Foil
Adapted from Everyday Italian by Giada de Laurentiis

Makes: 2 main-course servings

Ingredients:

·         1 medium tomato, chopped, or ½ (14-ounce) can diced tomatoes in juice, drained
·         1 shallot, chopped (if you’re not very picky, half of a small yellow onion will work just fine, too)
·         2 Tablespoons plus 2 teaspoons olive oil
·         1 Tablespoon fresh lemon juice (from about half a lemon)
·         ½ teaspoon dried oregano
·         ½ teaspoon dried thyme
·         ½ teaspoon kosher salt, plus a bit more for salmon
·         ¼ teaspoon black pepper, plus a bit more for salmon
·         2 salmon fillets (about 5 ounces each)
·         Parchment paper or aluminum foil


Instructions:

Preheat the oven to 400° F.  In a small bowl, stir the tomatoes, shallot, 2 Tablespoons of oil, lemon juice, oregano, thyme, ½ teaspoon salt, and ¼ teaspoon pepper.  


Place each salmon fillet, skin side up in the center of each of two large sheets of parchment paper (or aluminum foil).  Spoon 1 teaspoon of oil over the skin of each salmon fillet.  Turn the fillets over and sprinkle with a pinch of salt and pepper.  Spoon the tomato mixture over the salmon fillets.  Fold the sides of the parchment paper over the fish and tomato mixture, covering completely, and seal the packets closed by twisting the ends.  Place the foil packets on a large, heavy baking sheet.  (The salmon packets can be prepared up to this point 6 hours ahead.  Refrigerate until ready to bake.)


Bake until the salmon is just cooked through, about 23-25 minutes.  Using a large metal spatula, transfer the foil packets to plates and serve.  (You may want to unwrap and plate the fish in the kitchen before serving.)   


Poftă Bună! (Bon Appétit!)

August 25, 2015

Oatmeal with Blueberries and Toasted Pistachios

I’ve been quite lazy recently, especially when it comes to breakfast.  Hence, I’ve been experimenting and toying with various recipes, all of which did not involve much cooking but packed lots of flavor.  Yep...this summer, I’ve been munching on easy, clean, fast breakfast and sweet concoctions.  And this Oatmeal with Blueberries and Toasted Pistachios is no exception.


This recipe will take you only fifteen minutes to whip up, just slightly longer than this other morning favorite of mine, but I assure you it’s well worth it.  I love the warm and creamy oatmeal that gets soaked in a sweet and tangy homemade-like jam of bright blueberries, and is topped with roasted pistachios, while the cinnamon-sugar adds a spicy and crunchy finishing touch.  The whole combination is deeply colorful, toothsome and way more satisfying than its individual parts might suggest.  It will keep you sated for hours. 


I also love the versatility of this recipe.  You can vary it and customize it to your liking.  No blueberries?  No problem.  Use blackberries or raspberries, or a mix, or frozen berries.  Something tells me that even plums would work wonders.  Substitute pistachios with sliced almonds or walnuts.  And if you’re an almond milk fanatic, even better, use that instead of whole milk; its nutty flavor pairs really well with the oatmeal and brings that protein boost to your bowl.  You don’t fancy the creaminess, boil the oatmeal in water; no biggie.  I’m telling you, you won’t get bored easily with this dish.  Enjoy! 


Oatmeal with Blueberries and Toasted Pistachios
By Simply Romanesco inspired by Food & Wine (June 2015) and Giada’s Feel Good Food by Giada De Laurentiis

Makes: 2 servings

Ingredients:

·         2 Tablespoon pistachios, unsalted and roasted (sliced toasted almonds or chopped walnuts also work well)
·         1 cup whole milk (unsweetened almond milk will work wonders too)
·         Pinch of kosher salt
·         ½ teaspoon vanilla extract
·         ½ cup old-fashioned rolled oats
·         2 heaped Tablespoons sugar
·         ½ teaspoon cinnamon
·         1 cup blueberries (or a mix of berries)


Instructions:

In a small bowl, combine the sugar and the cinnamon and mix well.

If you can’t find roasted and unsalted pistachios at the grocery store, lightly toast them in a dry small skillet over medium-low heat, tossing often, until golden brown, about 4-5 minutes.  Transfer them to a plate.  


In a medium saucepan, bring the milk, the pinch of salt and vanilla extract to a boil over medium heat.  Add the oats and cook over medium-low heat, stirring often, until thickened, about 6-8 minutes.  I like my oatmeal creamier, so I take it off the heat after about 6 minutes.  Spoon the oatmeal into two bowls or jars or glasses.


In the same saucepan, add the blueberries and sprinkle with 1 Tablespoon of the cinnamon-sugar.  Heat up the blueberries over medium-low heat until juicy and soft and some of them burst, about 5-7 minutes.


Spoon the berry sauce over the oatmeal, top with pistachios, and sprinkle with cinnamon-sugar.


Poftă Bună! (Bon Appétit!)

July 31, 2015

Blueberry-Pistachio Galette

What do you do when you have heaps of blueberries and you don’t know what to do with them before they go old, wrinkly and mushy?  You toss them all into a glorious, summery galette, which is just a fancy French word to describe a free-form crusty cake.


This Blueberry-Pistachio Galette is rustic, unpretentious and slightly sloppy, so don’t worry if the dough breaks while baking and the filling oozes out a bit.  Sometimes I feel that the messier this galette looks the more beautiful it is, not to mention mighty tasty.  You basically have sweet, juicy blueberries encased into a rich, crisp crust.  I only used sugar for the finishing touch before popping the galette in the oven, but if you want to take it a step further, gently press a few sliced almonds into the crust and then sprinkle with sugar for that extra bite and crunch.  


This is by far one of the easiest desserts you’ll ever make and it’s a great stepping stone for novice bakers.  Serve it on its own or with a generous dollop of vanilla ice cream right on top to gently melt into the hot, bubbly blueberries.  So, don’t waste any more time and grab some blueberries, blackberries or even strawberries and start baking.   


Last weekend, Adrian and I had the pleasure to attend a fabulous wedding in our beloved Boston.  And I’d like to dedicate this galette to my best friend Rachel, the gorgeous bride, who loves blueberries, cooking, wine, the pink color, opera, and her husband Andi above all.  I feel so happy and privileged to have been a part of their special day!  It was a truly amazing, sophisticated and unforgettable wedding topped with an elegant layer cake of silky, lemony goodness dotted with bright blueberries, and a smooth, stripy tiramisu deliciousness.  Damn, that cake was good and the wedding was even better!  Casă de piatră!


Blueberry-Pistachio Galette
Adapted from Bon Appétit (July 2015)

Makes: 10 servings

Ingredients for the Dough:

·         ½ cup pistachios, toasted (pecans or almonds also work well)
·         1 cup plus 2 Tablespoons all-purpose flour
·         1 Tablespoon sugar
·         ½ teaspoon kosher salt
·         ¼ teaspoon cinnamon
·         ½ cup (1 stick) chilled unsalted butter, cut into pieces


Ingredients for the Filling and Assembly:

·         12 oz. blueberries (about 2 cups)
·         1 Tablespoon all-purpose flour
·         1 ½ teaspoons fresh lemon juice
·         ¼ cup sugar, plus more for sprinkling
·         All-purpose flour (for the surface)
·         2 Tablespoons milk, half-and-half, or heavy cream


Instructions for the Dough:

If you can’t find the already roasted pistachios, preheat the oven to 350° F.  Toast the pistachios on a rimmed baking sheet, tossing once, until fragrant and slightly darkened, about 10-15 minutes; let cool.  


Pulse the pistachios in a food processor until the consistency of coarse meal.  Add the flour, sugar, salt, and cinnamon and pulse just to combine.  Add the butter and pulse until the mixture resembles a coarse meal with a few pea-size pieces remaining.


Transfer to a large bowl; drizzle with 4 Tablespoons of ice water and mix, adding another Tablespoon of water if needed, just until the mixture comes together.  Gently pat the dough into a 6” – diameter disk.  Wrap the dough in plastic and chill for at least 1 hour. 

Do ahead:  the dough can be made 2 days ahead.  Keep chilled, or freeze up to 1 month.


Instructions for the Filling and Assembly:

Preheat the oven to 375° F.  Toss the blueberries, flour, lemon juice, and ¼ cup of sugar in a large bowl. 

Roll out the dough on a lightly floured surface to a 12” round.  Carefully transfer the dough to a parchment-lined baking sheet.  Mound the blueberries in the center of the dough, leaving a 2” border.  Fold the edges over, overlapping slightly.  Brush the dough with milk and sprinkle with sugar.  


Bake the galette until the crust is dark golden-brown and the filling is bubbling, about 45-50 minutes.  Let the galette cool before serving.

Do ahead: the galette can be baked 1 day ahead.  Store the galette tightly wrapped at room temperature.


Poftă Bună! (Bon Appétit!)